
- March 2019
- President’s Notes
- Perrin Edges Shearing Field
- Guest Opinion Shearer Teaches Tips, Tricks
- Convention: Annual Convention Carries Industry Into New Year
- Convention: Award Winners Accept Well-Deserved Honors
- Convention: AWC Wants Consumers to Experience American Wool
- Convention: YE’s Prove Competitive & Determined
- Convention: Lamb Council Examines Technology
- Convention: Monitoring Fake Meat
- Convention: Stakeholders Look to Harness Data
- Convention: Managing Parasites in an Age of Drug Resistance
- Convention: Resource Mgt. Take Aim at 2019 Goals
- Convention: Fungus is Coming
- Convention: Producers, Fishermen Share Common Problems
- Convention: Make It With Wool Fashion Show
- Market Report
- Around the States
- The Last Word
 Guest Opinion
Shearer Mike Pora Teaches
Tips, Tricks for Improvement
STEPHANY WILKES
Professional Sheep Shearer
I attended the 3Q Advanced Shearing School with Australian shearing guru Mike Pora from Jan. 28-30 in Newell, S.D., and thought other shearers might benefit from some of what I learned.
I took this class for a few reasons. First, as shearers are known to say, “If you’re working too hard, you’re working too hard,” and I am working too hard. Second, I wanted to learn more about shearing fine wool sheep, which are rare on the West Coast. I shear mostly crossbreeds, or non-fine wool breeds.
Third, at this stage in my life, I cannot get to Australia for a few months to learn to shear there. Well, technically I could, if I intended to abandon my grandmother with dementia and cancer here in California, but that’s not an option. I figured that if I can’t get to Australia, the Australian was coming to me, and that was the next best, doable thing. Young and/or unattached shearers, do you hear me? Go learn and work in Australia. See the world. Vamanos, whippersnappers. Fly, my pretties, fly.
Finally, I often work alone and not on crews with expert shearers who can teach me things. As a result, I develop my own shearing adjustments and bad habits, of both the conscious and unconscious sort. I needed eyes and expertise outside of me to help me learn and do better.
And it sure was a good excuse for a vacation with the lady shearers I’d only previously only met online – Katherine Ritchie and Wendy Valentine. We were in a Vogue article together in 2017, and now we’re friends.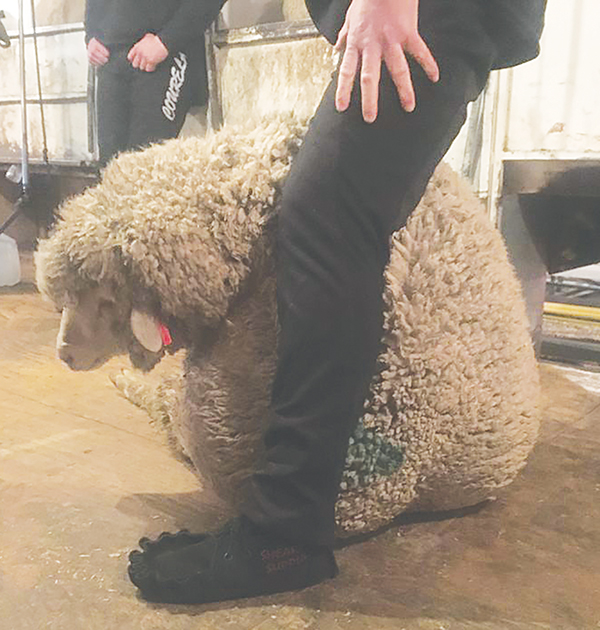
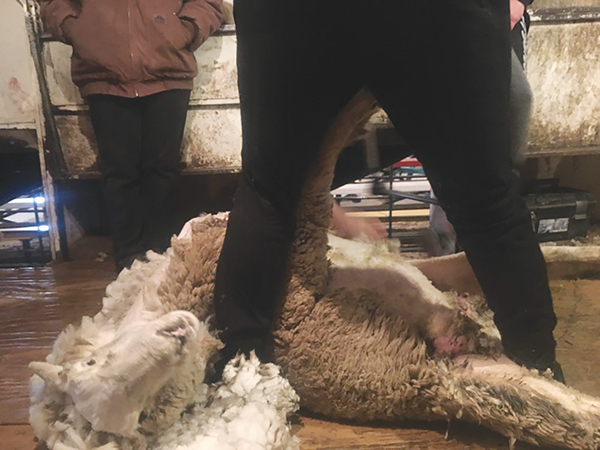
In regard to working less hard and doing everything we can to ensure we can shear as long as we can, Mike taught shearers footwork and positions to get the sheep to hold more of its own weight, and to get that weight off of our legs and knees. People think shearing is hell on our backs, and it can be, but my knees, quads and hamstrings take the brunt of it – because those hold the sheep.
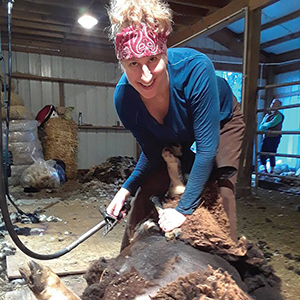
A few things to note in the first photo (right): The sheep is holding its own weight, comfortably shifted onto its right hip (not its tail, which sheep hate). Mike’s left knee is over the back of the sheep’s neck, and the sheep’s spine is behind Mike’s calf.
When standing this way, you can feel the sheep’s spine behind your left leg, its backbone leaning against your leg bone. The difference is that your left leg is not required to hold the sheep and prop it up. Your leg braces and grips the sheep, but does not support it.
After feeling the right way to do this, I realized that I often have the sheep’s spine on the wrong side of my leg, supported by my front shin, with my left knee holding up a substantial portion of the sheep’s weight (no wonder that knee is the crackly sounding one). Altogether, this meant that, while shearing the sheep’s first hip, I was supporting the sheep’s weight with my left knee, while also bending forward in half to reach over to the tail. Not fun, and so much harder than it needs to be.
We learned this lesson in the first hour of the first morning. So, early on, I had already learned something valuable that will make my life substantially easier, and prevent injury, wear and tear.
“This class doesn’t cost enough,” I thought, and I meant it.
But there’s something more going on in this position, too. Notice how the sheep is angled, almost matching the angle of Mike’s foot, which is not straight but pointed outward from his body. Mike is looking down over the sheep’s hip more than its belly. When shearing the belly, crutch and first hip, many of us are oriented more directly above the sheep’s belly, in a straight line, and not at this angle.
This brings me to another big lesson: crutching when the sheep’s weight is situated more like this, and not just when fully laid back as they can be during belly shearing. It was, initially, a bit mind-bending to look down and see the sheep’s crutch area less open and a bit more tilted, with its rear, left leg resting into the crutch area more than usual, but crutching was still possible, safe and made the transition from the crutch into the first hip much easier.
As for getting the sheep to hold more of its own weight…when I learned to shear, I was taught to have my right knee turned in to the right side of the sheep’s brisket when shearing the first hip. This meant my right knee ended up holding the sheep up at the brisket, not just bracing it but preventing it from slumping over to the right side. By copying Mike’s moves, the sheep supported more of its weight, required less of my leg pressure in the brisket and, combined with the sheep’s spine sitting behind my left leg, made for a much easier shearing of the first hip.
 But wait, there’s more.
The photo on the left might look like a typical one of shearing the first hip, but let me tell you about what Mike’s left hand is doing (and does next). Because the sheep is stable and holding a good bit of its own weight, Mike can really pull the skin on that leg juncture and hip right up toward him (not just rolling it toward him, but pulling that hip more up than over). This makes the skin taut on these wrinkly fine wool sheep, for a clean, nick-free hip of nice wide blows.
Another pro tip for this stage of shearing: On your blows up the spine, the bottom teeth should land where the tip of your middle finger on your left hand is. This sounds like I’m telling you to aim for your finger, and I’m not. What I mean to say is: When you’re finishing the left hip, doing those blows from the tail up the spine, and your left hand is pulling and rolling the sheep toward you so that you can reach to and over the sheep’s spine, the fingers of your left hand are pointed at the floor. The imaginary line that would extend from the tip of your left middle finger across the sheep’s back is the depth for which you should reach with the bottom tooth of your comb.
And now, a few words about neck blows. The sheep’s chin is at a 90-degree angle to it’s neck, a normal position compared to the sheep’s chin being pulled back, which would be akin to our walking around with our chins high in the air – neither normal nor comfortable.
Mike showed us how to pull the skin on the chin up to tighten it (much more comfortable for the sheep and its breathing), and NOT pull the chin itself, as some instructors teach, in the “Pull the chin taut and get through it quickly” school of thought. All shearers know – or should – that the greater the sheep’s comfort, the less it fights, and the easier the shearing is as a result. Shearers have every incentive to keep sheep as happy and comfortable as possible, and this is one more way to do so.
In the neck blow photo, you can also see how the sheep is supporting more of its own weight. The shearer’s right knee is still behind the right brisket, and both of the sheep’s right legs are behind his. The shearer’s right leg is where it’s supposed to be, in the crutch between both sets of legs. At this point, shearers are like “Duh, that’s what you’re supposed to do.”
But this is the most difficult footwork position for me, and always has been. So my WRONG AND ILL-ADVISED modification has been to push all of that sheep’s weight out in front of me during the neck blows, more akin to the position of shearing the last side. This puts all four of the sheep’s legs in front of my right leg, and all of the weight bowed out in front, supported – but NOT well controlled – by my right leg and left forearm and hand.
The upshot is that these maneuvers stretch the front shoulder skin out nicely, but that’s about the only benefit of my mangled, ugly dance. I don’t have enough control, the sheep feels like it’s falling forward and about to collapse toward the ground (because it is), and the sheep kicks because all four of its legs are totally free to do so. Joy.
 So let’s talk about what we should be doing on a wrinkly, fine-wool neck as taught at this advanced school.
In the photo on the right, Emily Chamelin Hickman (AKA Lady Shearer Prime) has the sheep in the correct position, and Mike (left) and Alex Moser (center) are talking about the pressure of comb teeth and the dreaded wrinkle. Fine-wool sheep (Merino, Rambouillet, etc.) have a wrinkle like a wattle, and shearers take great care not to cut it. Mike showed us how, on the first neck blow, you want the comb pressure on the top teeth and, on the second blow, on the bottom teeth. This effectively leaves you shearing each side of the wrinkle and not cutting it. This is a very subtle, nuanced and important technique.
I have been using a neck blow modification that has worked well so far, and that Matt Gilbert taught me especially for wrinkly-necked fine wool sheep. I might continue it even after this class, but will devote time to practicing Mike’s method. Matt’s modification is to turn the sheep’s head to move the wrinkle. You can get an idea of this using your own neck.
Look straight ahead, and turn your level head all the way to the left. The skin on the right side of your neck is smooth, and there’s a wrinkle on your left side. So, you would shear the smooth, right side where there’s no wrinkle to worry about. When you turn your head to the right, the wrinkle is on your right and your skin is smooth on the left, so you shear the left. This cleans the neck in two wide passes. Now, let’s talk about the long blows.
Notice below how the sheep is on its back more than on its side, and that the sheep’s right shoulder and brisket are against the shearer’s left shin. This creates more control of the sheep. I have not been doing this properly.
 I hate to admit – after six years of shearing – that I sometimes still turn the handpiece off, walk the sheep into this position, and start up the machine again. The pros spin the sheep around and, as it lands in this place, take the first blow without skipping a beat. Sometimes I do that, just not as often as I’d like.
Mike asked a good question, “Stephany, what does a hay bale do on its end?”
“It spins,” I said. And there’s the wisdom. If the sheep is sitting on a small point, and holding enough of its weight, you can basically pivot/spin it down into the long blow position.
Another lesson I will implement right away is the six-sheep focus technique Mike taught: Pick one improvement to focus on (a certain footwork position, comb pressure on the sides of the neck wrinkle, etc.), and focus on that for the next six sheep. Pause, evaluate how you’ve done and what you need to fix, and shear the next six sheep.
My self-assigned homework is to find some sheep to walk around with. If I had my own sheep, I would do nothing but walk them through each position with only my legs – hands free – until I got every bit of the footwork right. Shearing jobs don’t lend themselves to this, as the job needs to get done, but I’m thinking of asking some friends to let me walk their sheep around with my legs for a day. This is why we take time for things like school, though: we can practice at school in ways we cannot on a paid job.
I can’t cover everything I learned in just a few days, but I hope this inspires other shearers to take a course with Mike, the master of nuance and finesse.
Stephany Wilkes is a sheep shearer and published author who lives in San Francisco. Learn more at StephanyWilkes.com.